Or you can import the city from the game. For this, select corresponding option from the menu,
choose game server and world and type player’s name. It’s better to type the whole player’s
name. There is a chance to import the city of the player with similar name otherwise.
New tile will appear on the Dashboard after the city has been successfully created.
You can set city name during creation process. Better to make names unique but this is not
mandatory.
Working with the planner
Click on any tile on the Dashboard to load the city.
New info and options will appear at the top toolbar when the city is loaded. You will see city
name, buttons for different actions and city statistics.
Do not forget to save the progress from time to time.
To delete the city, hover over gear icon on the tile (on the Dashboard) and select Delete from
the menu. You will not be able to undo this action.
To duplicate the city, hover over gear icon on the tile (on the Dashboard) and select Duplicate
from the menu.
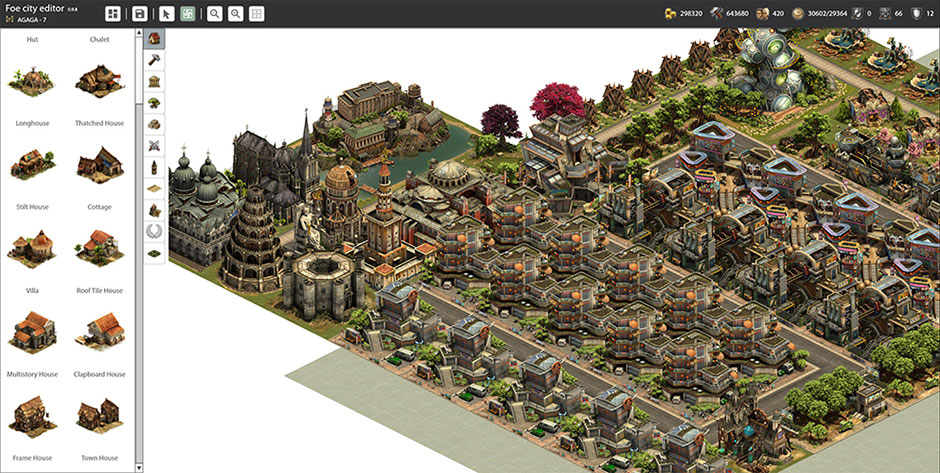
Constructing the city
There are 2 modes in the planner – selection and construction, and you can switch between them
with corresponding buttons. The construction mode is the default.
Construction mode reveals construction menu. It is the list with all available buildings, sorted
by type (you can choose concrete type by clicking on corresponding buttons) and by age.
City territory has same shape as in the game. Some areas are locked. You need to add expansions
to unlock new territory. To do this, select corresponding option in the Construction menu.
To add new building to the city – click on the item in construction menu, move the mouse in the
desired location, click the left mouse button again. You can keep adding same building/road
until you select another city entity or cancel the process.
To move the building on the map – click on the building, then perform similar steps like when
you put the new one.
To cancel selection of the building – either click right mouse button or hit Esc on the
keyboard.
To delete the building – click on the building and hit Delete/Backspace on the keyboard
To move the map – press and hold left mouse button and start moving. You can perform this action
when some building is selected too.
To change map scale – either use mouse wheel or corresponding buttons on the toolbar.
You can hide the graphics of all buildings to better locate unused space and check street
connections. There is a button for this action on the toolbar.
Selection mode lets you access information and settings of concrete building. You will be able
to set the level of great buildings, age of bonus buildings, production option and the amount of
collections for production and residential buildings.
Do not forget to save the progress from time to time. Confirmation will appear at the bottom of
the screen when the city has been successfully saved.
City statistics
Following values are included: money, supplies, population, happiness, fierce resistance,
military boost, defense support.
Money and supplies numbers are values per day. Boosts for these values (from great building
bonuses) has not been included yet.
Money and supplies statistics calculations consider selected product and amount of collections.
You can set both values in Selection mode. By default, 8 hours product is selected, and the
amount of collections is set to 0 (which means max possible collections per day).
City sharing
You can share the city you made in the planner with others.
To do this, click on Share menu which is available for each dashboard item (hover over gear icon
on the tile to reveal the menu). New dialog will appear. Click on Start sharing button to make
your city public. You will get alphanumeric sharing Tag. Click on Copy tag button to copy the
string to clipboard. Send this tag to anyone you want. For convenience, all shared cities are
marked with dedicated icon on dashboard.
You can continue editing shared city as you always do. Note, modifications are not synced
with those who has imported your city previously. However, all new imports will contain your
modifications.
To load shared city, click on Add new city button on Dashboard, select Load shared city option,
paste or type tag, (optionally, change city name) and click OK. You should get new city added to
your Dashboard. From now, this new city has no connection to original one.
To stop sharing, click on Share menu which is available for each dashboard item. The dialog will
appear. Click on Stop sharing button. Nobody can load this city with previous tag now. You can
start sharing same city again. However, completely new tag will be generated.
Current limitations (something that is
missing but we are aware of it):
you cannot remove city expansions
city thumbnails on the dashboard are not generated (static image is used)
there is no information for goods and military buildings